With Thanksgiving, Black Friday and Cyber Monday behind us, most folks can begin to focus on getting their holidays decorations out of boxes that have been hidden away in storage for the past 11 months and can again begin to decorate their homes, shrubbery, trees etc.
I have seen some pretty spectacular holiday light displays, and cars line up outside the subdivision for what feels like hours so that everyone can ooh and aah at the night time wonders that are Holiday Lights. Someone pulls out a camera, takes a ton of photographs, but inevitably, they are bound to be disappointed with the pictures they took. Either they were so far away, that you can't see much of anything, or else they were so close and the flash went off creating daylight and hiding the beauty of the lights.
How can a person capture the beauty of Holiday lights? Last week I ran across a blog at one of my
favourite sites to rent equipment from. Roger Cicala is a super guy, easy to work with and runs a top notch company. I am going to copy his blog here, as well as post a
link back to the original article so that you can reference it yourself.
Stop down and use a tripod
OK, you knew it was coming. The most important thing you can get for shooting lights during the Holiday season is a tripod. Yes, I know you have image stabilization on your lens (or in your camera). But if you want the lights to really shine, you’re going to need a tripod. The reason is Light Rule # 1: Stop the aperture way down when shooting lights. If you shoot wide open, say f2.8 or more, the lights show up as glowing little blobs. But if you stop down. – way down, down where diffraction softening would interfere with a sharp daytime shot – you get awesome star points from your lights. Look at the same shot below, taken from f2.8 to f22. Major difference.
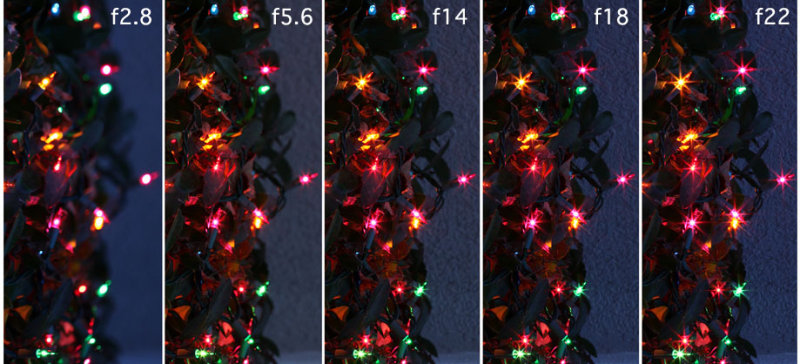
The effect is well worthwhile, but by the time the aperture was reduced to f8 (which still didn’t give great stars) the exposure time was almost a second. Way too long for any amount of Image Stabilization to be effective, so a tripod is a necessity if you want pointy-star lights.
BTW – here’s your photography equipment trivia of the day. Did you know you can tell how many aperture blades the lens has by the number of rays on the star? If the lens has an even number of aperture blades, the star will have the same number of rays as the number of aperture blades: 6 blades, the stars will have 6 rays, etc. If there are an odd number of aperture blades, the stars will have twice as many rays as there are blades: 7 blades, the stars have 14 rays. (The reason is that each blade makes two rays, but with an even number of blades two rays overlap at each location, with an odd number they don’t overlap.) Why does this matter? Because some of the lenses famous for their smooth bokeh have 9 aperture blades. The 18 points that result from these when stopped down tend to blur and not be as dramatic.
Dusk, not dark!
You know the ‘golden hour’ that landscape photographers talk about, the time just after dawn when the light is soft and angled and you get the best landscape images? There’s a similar time for shooting lights, the hour right after dusk. During this time there’s still enough light left to allow you to see at least an outline of the house, people or whatever else is being lit, instead of just a pattern of lights.
Fill flash / double exposures
When shooting indoors I go to lengths to avoid flash, especially direct flash. But outdoors its very useful. Especially if you miss dusk and things have gotten dark. A bit of fill flash can show the details of the house, gardens, or even the Christmas tree that would otherwise be lost if you’re exposing just by the lights.
There are several ways to set flash so that you don’t blow out the lights. Many flashes will let you choose a “fill flash ratio” or number of “stops of compensation”. A 4:1 ratio (which is the same as -2 stops of compensation) is usually about right. With a tripod, though, you will get better effects by what is variously called slow sync or dragging the shutter. With this technique you’re basically using a long exposure to get the pretty lights followed by a brief burst of flash to expose the background. The technique varies a bit depending on camera and flash brand, but I generally use it in Aperture Priority mode (to set a high f-stop to make the lights twinkle) and the camera will automatically set the flash for fill-flash function. If there is too much or too little flash, you can correct the next shot with exposure compensation. There are lots of other ways to do it but a half hour of experimenting (along with GASP reading the flash manual) will get you comfortable.
If you don’t want to mess with flash, then shooting two exposures (Ha! You’ll need a tripod again), one exposed for the background the other stopped down to expose just the lights, is an easy solution. You can combine as layers in Photoshop (I usually use the blend-if sliders, but there’s lots of ways to do it).
Swirls and effects
If its pitch dark and you don’t have your tripod (or even if its not pitch dark and you do) Holiday lights are a great time to totally play around. Set your aperture and ISO so the exposure time is a second or two, then move the camera around during the shot, zoom the lens in and out, whatever floats your boat to get some nice abstract patterns. They’re pretty by themselves, but if you put them as a layer in photoshop over a properly exposed image you can do all kinds of fun things using the “blend if” sliders, etc.
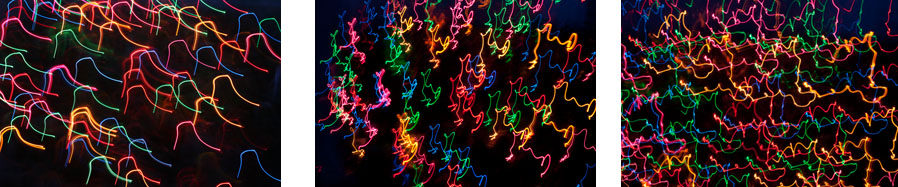
Three shots of the same set of lights with different camera movement during 1 to 2 second exposures
Reflections
Especially when shooting entire buildings, things are twice as pretty if you get the lights reflecting from other surfaces. Of course Christmas lights reflecting off a pond or lake is beautiful, but we don’t always have a pond or lake handy. Rain puddles, snowmelt, or ice all make the lights can all provide great reflections. Indoors lights will reflect from mirrors, but at night they’ll also often reflect from windows, glass cabinet fronts, or off of a well polished floor (like the pond, at my house there’s usually not a well-polished floor handy).
White balance for snow!
Most cameras auto fill-in-the-blank functions struggle with snow. Auto exposure and autofocus are not much of a problem when shooting lights because the high contrast lights will lock on autofocus easily and we’re usually setting long exposure times. The Auto white balance is usually useless when there’s a lot of snow, creating blue or sometimes yellow casts. To me the simples solution is shoot everything in RAW and correct it later, but most people set their white balance manually before shooting in snowy conditions. Just setting white balance on a clean, not shadowed patch of snow should do the trick.
Thanks Roger! That was a great tip.
Well folk, that's it for now. I'll keep the posts coming.